You will need the following
supplies:
A piece of animal rawhide -- fairly thick --
0.75-1.5mm,such as elk or thick deer
Wooden hoop for the frame,
these can be purchased online or at a hobby store
Rawhide strip for the
lacing.
Water and large container.
Scissors and sharp
knife
Awl
Plastic tarp sheets.
Water soluble artist's
pencil.
THE FRAME
It is recommended to make a drum with a diameter of less than
12''. The depth of the frame is a variable; for a drum of 14''diameter or
so, a depth of 3'' should be sufficient. For larger drums the frame needs
to be deeper. This is partially for the look of the finished drum, but
also to give the hoop more strength: the stretched dry skin will put quite
a strain on the hoop, and may bend it, or at worse implode it. Because of
this it is recommended the that hoop is made of wood of at least 1/8''
thick.
Preparing the Skin
~The skin needs to be soaked until it is soft. Use the
bath for this, filled with cold water. The time for this will vary
depending on the type of skin used. Make sure the skin is totally
submerged.
~Once the skin is soft, it can be worked with. Place it
on a flat clean surface (use the plastic ground cloth to protect the
floor) and select the part of the skin you will use for the drum head.
Place the frame on this area to make sure it is big enough and totally
free of holes or very thin parts. Remember, this is drum that you will
keep for a lifetime and possibly pass on to next generations. The time you
spend on the inspection of the skins, will be worth it. Once you are
satisfied, use the pencil to draw a pattern round the frame. If you are
doing a double sided Drum, repeat the same for the second skin.
~It
is always better to draw on the back of the skin, the part that was inside
the animal, as the outer part (the grain side), will be the part that you
put on the outside of the drum. The way to tell the two sides apart is
that the grain side has a surface that is looks like leather (generally
smooth to the touch), and the inner side, has small cuts and scraped areas
where the skin was fleshed after it was removed from the animal and has a
rough touch.
~Remember that the circle you cut needs to be a lot
bigger than the head of your drum, as it will have to go up the sides of
the frame and a little way on to the back of the drum. As a rule of thumb,
for an 12'' diameter drum on a 6'' deep hoop, you will need a circle of
about 16''. Once the correct sized circle is drawn, it can be cut using
sharp scissors. Put the complete circle back into the water to keep it
soft and wet until you use it (unless its a double side Drum, then the
edge of the skin should cover a third of the wall of the
Drum).
~With the remainder of the skin, you can now cut the lacing
you will use to lace the drum skin onto the frame. This needs to be long
enough to do the whole lacing job, wet rawhide is not easy to join, knots
slip very easily. The length of lace needed, varies according to the size
of drum made, for an average drum, 20 times the diameter of the frame is a
good length. This can be cut by spiraling around a roundish shaped off-cut
of skin. Cut it approximately 1/4'' wide. It is always better to have the
laces too thick rather than too thin, as later when you are tightening up
the drum, you will be pulling quite hard on them, and the lace will
stretch and get thinner and you do not want it to break. Once you have
your lace cut, put it and all the spare skin you have back into the
water.
~The next job is to cut the holes in your drum head that the
lace will pass through. Using your pencil, mark the spot where you will
punch the holes. With an adult watching, use the AWL to punch the holes.
Be sure the holes are evenly spaced, so the tension will be even across
the Drum head. Be sure you use an odd number for the total hole punched
(7,9,11 etc.). The cut should be at least 1'' from the
edge.
Just remember, once you get started with the lacing, you cant
stop. If you find you don't have time, you can leave them in the water to
soak (but no longer than over night) or let them dry in an open air place
and when you go back to work on the Drum, re-soak them.
Putting the drum together
~Begin by placing the circle of soaked skin grain side
down on the ground sheet. Place the hoop over it so that the surplus skin
is evenly distributed all around its edge. The skin can now have the lace
put through its holes. When the skin is laced up, the slack of the lace
must be taken up, and the drum skin tightened. Begin this by working the
lace from one end to the other, gently pulling it as you go. By pulling it
thus, you will take up the slack, and stretch the lace itself. If you are
making a double head drum the lacing is different. Its like lacing a shoe.
Take the 2 ends of the rawhide, lace in opposite holes and criss- cross as
you lace. Remember to tighten and pull up the slack as you go. In the
beginning of the threading, leave a hoop at the top, this will be part of
the handle to carrying the Drum. Once you have pulled and tighten the
slack on the double headed drums as much as you can, take the ends of the
rawhide and wrap it around the hoop you made in the beginning of the
lacing. To finish off the handle, knot the lace on the end of the handle
and tuck into the lace it self (as the leather dries, the leather shrinks,
thus making a tight bond)
~Once the slack has been all worked through, begin the
whole process again, and then again, and again, until it feels like you
cannot get any more slack out of the lace. Do not be afraid to pull quite
hard on the lace, but do be careful not to break it, or the holes in the
drum head; especially be careful if you are pulling on a particularly thin
piece of lace.
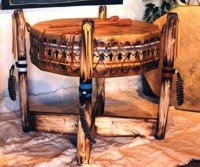
~Once you feel satisfied that you cannot get any
more slack out of the lace, you can begin to bind the back into a cross
shaped hand hold. Not only will this make the drum easier to hold, but the
act of making the cross squeezes the crisscrossing spokes of lace together
and puts even more tension into the drum.
~If you have made a drum
with 17 lacing holes in the head, you will have 17 spokes. This cannot be
divided by 4 evenly, so we suggest you divide it into 3 lots of 4 spokes
and 1 of 5. Select a group of four adjacent spokes, and either using the
spare end of your lace, or a specially cut piece, bind them together.
Begin in the center of the drum, and bind outwards approximately 75-100mm.
This binding can be finished off by using the spokes as the warp threads
and the binding lace as the weft, and weaving a little section at the top
of the binding. Tuck end back through weaving and trim
underneath.
When you have done one arm of the cross in this manner,
do the opposite arm, and then the two other arms.
~at this point, you are done! Place the Drum in a warm, airy
place. Avoid hot places, it will cause the leather to dry too quick. If
your Drum does not dry out evenly, the frame may warp as it dries, and you
will end up with a twisted drum. If you put enough tension into the wet
rawhide, when it dries out, you will have a wonderful resonant drum; if
you didn't, your drum may sound more like a cardboard box. If your brave
enough and want to, you can take apart your drum and start over. The skin
and hoop will be OK, but you will have to cut more lace.
~ If you
like, you can paint your drum. The picture at the top of the article will
give you a couple ideas. You can take a piece of soft leather or fur and
wrap your handle with it to soften the
handle.