Native American Choker
|
You Need:
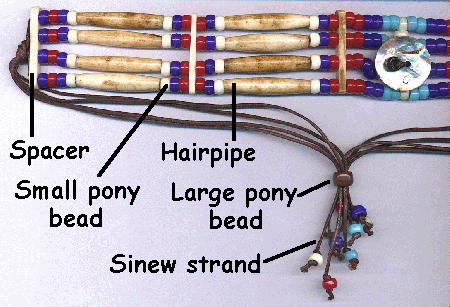
I use bone hair pipes. If you want them to look "old" simply soak them in concentrated tea for a while. They won't all come out the same, but that's part of the charm. I used 1.5-inch hair pipes, but you might use 1-inch ones if your neck is a little smaller or 2-inch ones if it's larger. Pony beads are available in at least two sizes. The medium ones I used are about 1/4-inch in diameter; the larger one is 5/16-inch diameter. You can make the sinew strands longer if you want them to hang down farther. I bought bone spacers to go with the bone hair pipes, but you could make your own out of strips of leather. The length of the spacers determines the width of the choker; mine were 1.5 inches long. Four holes were drilled in each one about 3/8-inch apart. You could use 1/4-inch strips of leather 1.5 inches long and drill holes 3/8 inch apart to achieve the same effect. You can get all these things in hobby stores. To begin assembly, tie a temporary overhand knot using all four strands of sinew 8 or 9 inches from one end. Then put on one spacer so that one of the strands goes through each of the holes. Put 4 beads (different color patterns give different looks, so experiment), 1 hairpipe, and 3 more beads on each stand. Then add another spacer, and put 3 beads, another hairpipe, and 3 more beads on each strand. Now, add 7 more beads and you've past the mid-point. Repeat everything you've added above, except the last bead, in the reverse order to finish the other side of the choker. After you put on the last spacer, tie another temporary overhand knot using all four strands of sinew. You should have 9 medium pony beads left. Untie the two overhand knots and slide the beads along the strands until the same length of sinew extends from both ends of the choker. Be sure to keep the beads close together as you do this. Once you have made this adjustment, retie the overhand knots. This time they're permanent. You could use the choker as it is, simply tying the strands together behind your neck. But I like it a little more finished. I ran all 8 strand ends through the large pony bead. If you select the pony bead right, it should be a tight fit. Then, on each strand (8) tie an overhand knot about 3/4-inch from the end, string on a single medium pony bead and tie another overhand knot. This arrangement will prevent the strands from inadvertently pulling out of the large pony bead. To put on the choker, simply slide the large pony bead to the end of the strands, slip the choker over your head and then slide the large pony bead toward the choker, tightening it around the neck. If you want to, you can add a button to the center of the choker with the final medium pony bead in its center. |
